
Help Center
Campaigns
Send targeted email and SMS campaigns - broadcasts, multi-step sequences, A/B testing, and analytics. Author emails as visual blocks or as raw HTML.
Last updated
The Campaigns module lets you send targeted email and SMS messages to groups of contacts. You can send one-time broadcasts to a segment, build multi-step sequences with delays between messages, run A/B tests, and track performance with detailed analytics.
Campaign Types#
| Type | What It Does |
|---|---|
| Broadcast | A single email or SMS sent to a segment at once (or scheduled) |
| Sequence | A multi-step drip campaign - multiple messages sent over time with configurable delays between each step |
Creating a Campaign#
- Click New Broadcast (now the primary button on the campaigns list) or New Sequence
- Enter a campaign name
- Choose a starting point - Blank to start from scratch, or From Template to use a saved template
- Choose an authoring mode - Blocks (visual canvas) or HTML (three-panel code editor). This is picked at create and cannot change afterward. Two authoring modes describe the same email in incompatible ways, so a mid-flight switch would silently overwrite a finished body
- You are taken to the campaign editor
Organization#
Campaigns can be organized into folders. Create, rename, and nest folders from the campaign list page. Move campaigns between folders individually or in bulk.
Audience and Targeting#
Selecting an Audience#
- All contacts - Every contact with the relevant channel info (email address for email campaigns, phone number for SMS)
- Segment - Choose a saved segment from the dropdown to target a specific group
The audience preview shows:
- Total matching contacts
- A sample of matching contacts
- How many contacts will be skipped due to suppression (bounced, unsubscribed, or complained)
The count updates in real time as you change the segment selection.
Email Editor#
Subject Line#
Enter a subject line with optional merge fields - for example, Hi {{contact.firstName}}, check out our latest updates.
Body#
Body authoring is one of two modes, chosen at create time and fixed for the campaign's lifetime.
Blocks (visual canvas). Drag text, image, button, columns, divider, and spacer blocks onto a canvas with a live phone-frame mobile preview. Supports bold, italic, links, lists, and images. A single description of rich text drives both the canvas and the delivered email, so what you see is what recipients get.
HTML (three-panel editor). A code pane on the left, a live preview on the right, and a divider you can drag to give either side more room. If you author or generate HTML in another system, you can push a finished email in and send it without opening the block builder. The email layout editor uses the same surface, so the two behave alike.
Both authoring modes go through the same tracking, provider setup, unsubscribe treatment, suppression checks, and audience selection.
Code editor#
Every place you write code in the CRM (HTML block, email layout editor, custom CSS box) is a real code editor with syntax coloring, bracket matching, line numbers, proper indentation, and long-line wrapping. The palette adapts to light and dark; the accessible-contrast threshold is enforced by a build test that fails if any editor color drops below it.
When a broken layout or a bad merge field prevents the email from building, the error message points at the line and the code editor marks that row so you don't have to read the whole body to find it.
Email layouts#
A layout is the branded shell around an email - the masthead, the sign-off - written as HTML. Campaigns you build in the block editor are placed inside it when they send, so changing the layout changes every email that uses it instead of you editing each one.
Create one from Email Templates → New → Email layout, which opens a code editor rather than the block canvas (a layout is markup you control). Layouts appear in the Templates list so you can find and edit them, but they are deliberately kept out of the pickers you send from - a layout on its own is a shell with no message in it.
Sequence step authoring#
Each step inside an automated sequence chooses Blocks or HTML the same way a one-off broadcast does, and the choice is per step. A sequence can mix them.
Tracking domain#
Campaign links now go through your tracking domain instead of a shared one, so click-through URLs display your brand and your sending reputation carries the click. Set this up in Settings → Domains by adding the tracking record alongside your sending domain DKIM records. If your sending provider does not support tracking domains (for example, some transactional providers), tracking is disabled for that campaign.
Preview and Test Send#
Preview mode shows how the email will look to recipients, including for HTML-authored campaigns (previously blank). A failed Test Send now surfaces the actual delivery error rather than a generic message, and the Checks tab explains what to fix.
Merge Fields#
Click the Variables button to insert personalization tokens:
- Contact fields - First name, last name, email, phone, company, and any custom fields
- Custom values - Company name, website, and other values configured in settings
- Utility fields - Unsubscribe link (automatically added to the footer if not included in the body)
Unsubscribe Link#
If your email body does not include an unsubscribe link, one is added automatically to the footer. You can control placement by inserting the unsubscribe token manually.
What an Unsubscribe Actually Stops#
An unsubscribe stops marketing email: campaigns, newsletters, and the marketing steps of a sequence.
It does not stop transactional email, which is mail the person is expecting because of something they did: a booking confirmation, an invoice or receipt, a document to sign, a reply to their own message. Someone who opts out of your newsletter still gets their receipt. Texting STOP to your SMS sender behaves the same way - receipts, invoices, and other transactional messages still reach the recipient.
This split is the reason marketing and transactional mail should sit on separate senders in your sending rules. It also means an unsubscribe is never a reason a customer stops receiving the operational mail your business depends on.
How opt-outs propagate#
The unsubscribe state is honored anywhere a marketing message is chosen, not only on the specific list where the person clicked:
- Sequences stop the marketing steps for that contact rather than silently continuing the whole sequence.
- Smart lists exclude an unsubscribed contact from every send that resolves them, even if the person is a member of an unrelated smart list.
- Merging contacts preserves the unsubscribe state on the surviving record; an opt-out cannot be erased by merging over the top of it.
- Preference center Save no longer treats a click as a global unsubscribe. It only writes the categories the contact actually toggled off.
- The Manage preferences link on the unsubscribe page now works. It used to always show an error.
Scheduling requires a list#
A scheduled campaign must have a list or segment attached before it is queued. Previously a campaign could be scheduled without one, which switched off the unsubscribe check for that send. That path is closed - scheduling without an audience is now rejected with an error.
Global email footer markers#
Transactional mail must carry your business address but must not carry an unsubscribe link. The global email footer uses two markers to gate the address block. If your footer has no markers, the block is silently dropped from transactional mail, so those emails go out with no address at all. Every footer configured before the 5.7.0 update is in this state - open Settings → Business Details → Global Email Footer and re-save it to write the markers.
SMS Composer#
Message#
Type your message in the text area. Use the merge field button to insert contact fields.
Character Count#
The composer shows a live character count and segment estimate:
- Standard characters: 160 characters per segment
- Extended characters (certain symbols and emoji): shorter limits apply
- The display updates as you type, showing the encoding type and number of segments
Preview#
A phone mockup on the right shows how the message will appear to the recipient, with merge fields replaced by sample data.
Multi-Step Sequences#
Adding Steps#
Click Add Step to add messages to your sequence. Each step is a collapsible card showing its position number, subject (for email), and delay.
Delay Between Steps#
Set a delay before each step sends - minutes, hours, or days. For example, send step 2 three days after step 1.
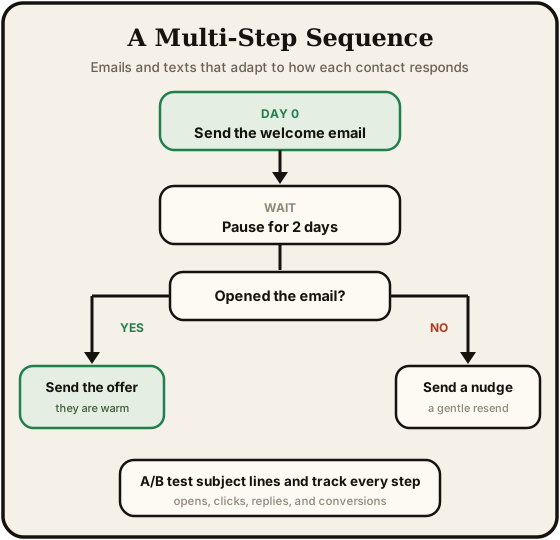
Conditional Branching#
Optionally enable conditional branching on a step to route contacts based on engagement:
- If opened - Contact opened the previous email → go to a specific step
- If clicked - Contact clicked a link → go to a specific step
- If not opened - Contact did not open → go to a different step
- Otherwise - Default path if no condition matches
This lets you create adaptive sequences that respond to how contacts engage.
A/B Testing#
A/B testing is available for email broadcasts.
Setting Up a Test#
- Toggle A/B Testing in the editor
- Create up to 4 variants (A, B, C, D)
- Each variant has its own subject line and body
- Set the percentage of recipients for each variant (must total 100%)
- Use Distribute Evenly to auto-balance percentages
Viewing Results#
After sending, the analytics page shows per-variant metrics - open rate, click rate, delivery, and bounces. You can declare a winner based on the results.
Scheduling and Sending#
Send Immediately#
Click Send Now to start delivering the campaign right away. Messages are sent in batches.
Schedule for Later#
Click Schedule to pick a date and time. The campaign enters a Scheduled status and sends automatically at the specified time.
Active Hours#
Optionally restrict sending to specific hours of the day in a chosen timezone - for example, only between 9 AM and 5 PM Eastern. Messages outside the window are queued until the next active period.
Campaign Statuses#
| Status | Meaning |
|---|---|
| Draft | Not yet sent - fully editable |
| Scheduled | Queued for a future send time - read-only until the time arrives |
| Sending | Actively delivering to recipients in batches |
| Paused | Sending halted - can be resumed to continue |
| Sent | Finished delivering to all recipients |
| Cancelled | Sending stopped and will not resume |
You can pause a sending campaign and resume it later. Pausing stops new deliveries but does not retract messages already sent.
Analytics#
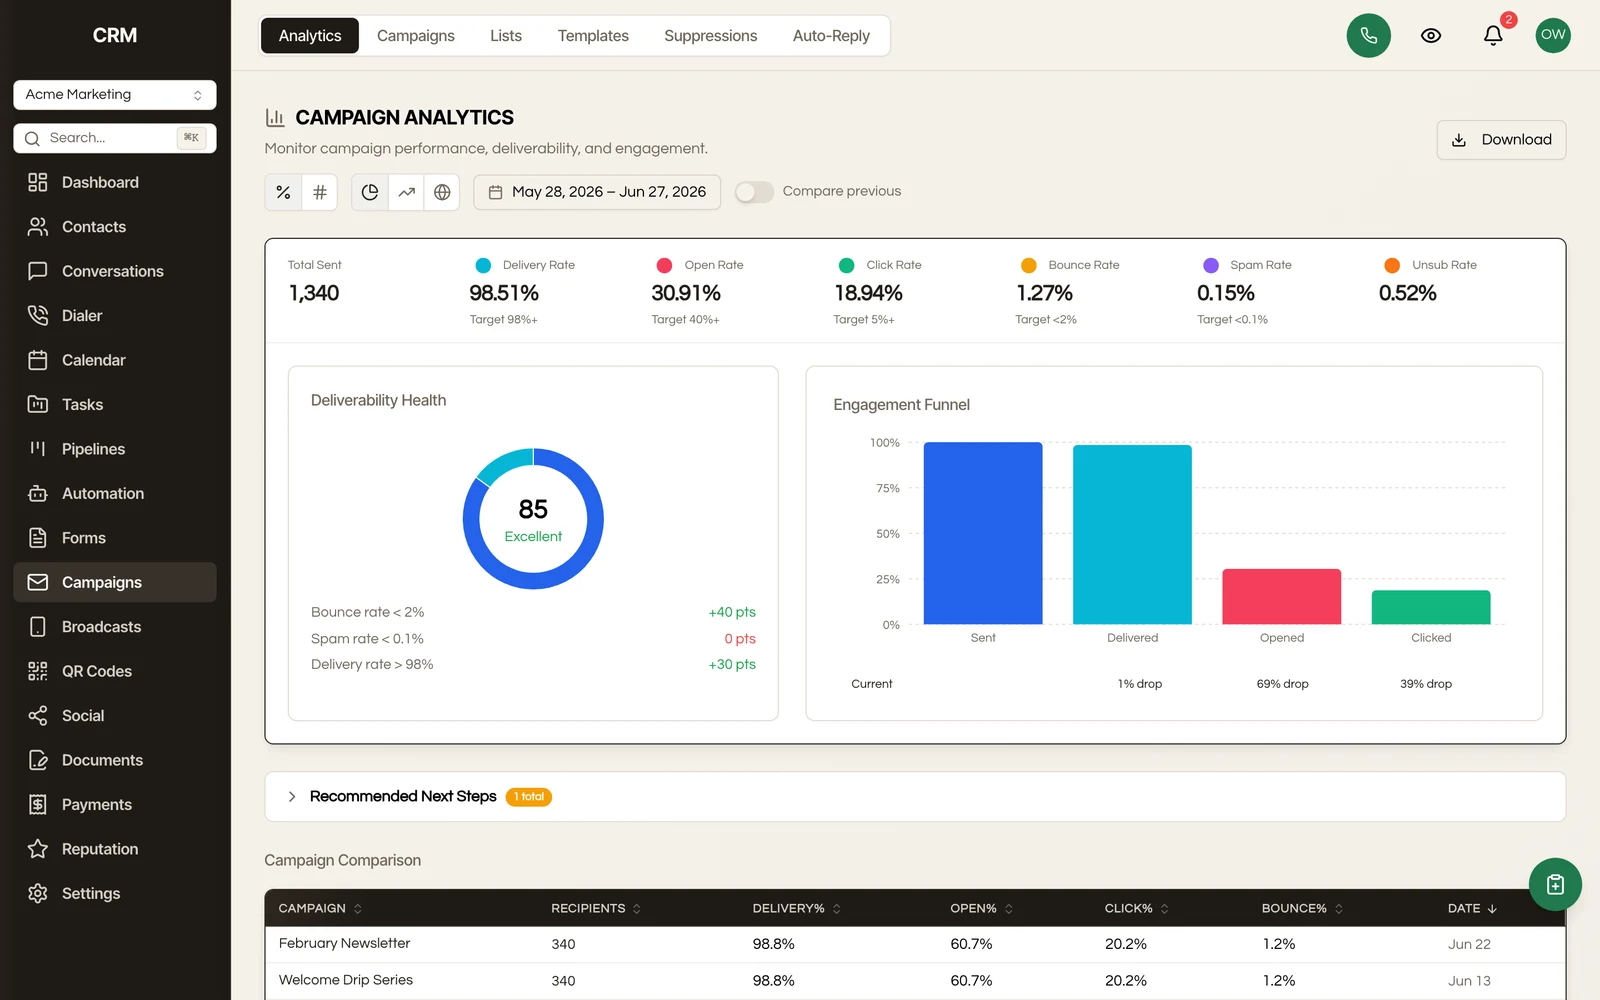
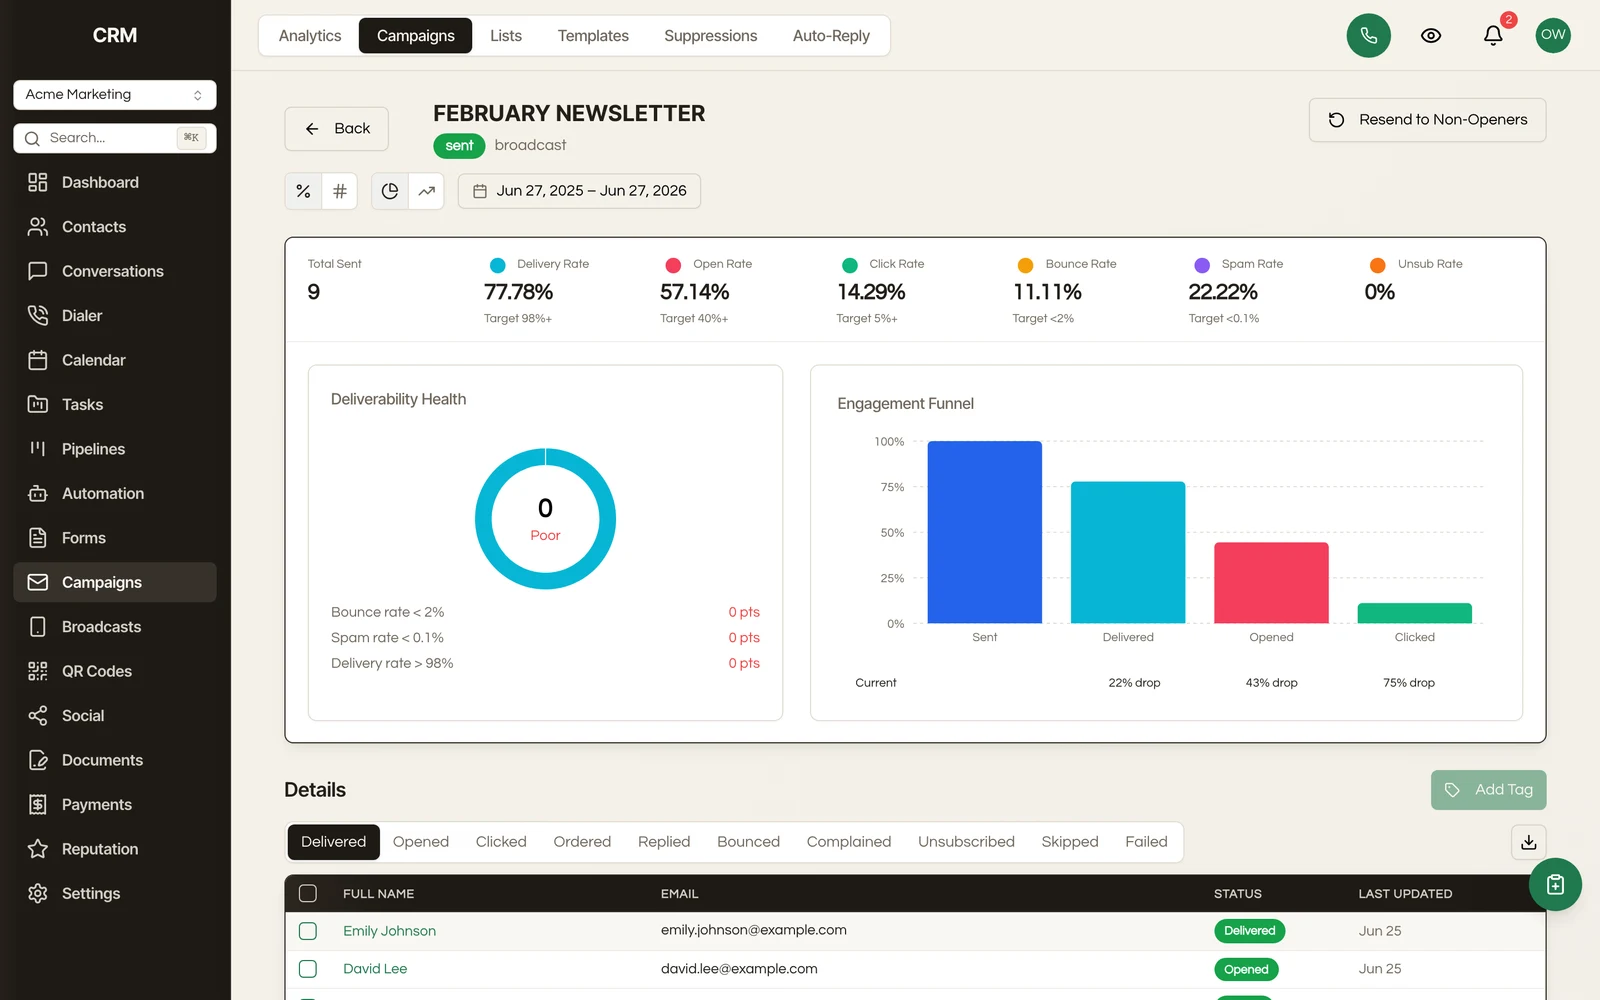
After a campaign is sent (or while sending), the analytics view shows:
Key Metrics#
- Sent - Total messages dispatched
- Delivered - Successfully reached the recipient
- Opened - Recipient opened the email
- Clicked - Recipient clicked a link
- Bounced - Delivery failed
- Unsubscribed - Recipient opted out
- Spam complaints - Recipient reported as spam
Toggle between percentage and count views.
Engagement Funnel#
A waterfall chart shows drop-off at each stage: Sent → Delivered → Opened → Clicked.
Performance Over Time#
A line chart shows opens and clicks over days, weeks, or months.
Per-Step Performance (Sequences)#
For multi-step campaigns, a table shows metrics for each step - sent, delivered, opened, clicked, bounced, and drop-off rate between steps.
Recipient Details#
Browse individual recipients by status tab (delivered, opened, clicked, bounced, etc.). Export recipient lists as CSV or bulk-tag recipients for follow-up.
Click any recipient row to open a detail drawer with three sections:
- Engagement - a visual timeline showing the delivery journey: Sent → Delivered → Opened → Clicked. Each step shows the exact timestamp when it occurred or a placeholder if the step hasn't been reached. If the recipient bounced, unsubscribed, or filed a spam complaint, a red badge appears at the end of the timeline.
- Contact Info - email, phone, company, and lifecycle status for the recipient, with a link to open their full contact profile.
- Campaign Info - the A/B variant assigned (if A/B testing is enabled), the current sequence step (for multi-step campaigns), and the exit reason if the recipient left the sequence early.
KPI Drill-Down#
Click any metric card in the analytics section (Delivered, Opened, Clicked, Bounced, Spam, Unsubscribed) to jump directly to the recipient list filtered to that status. The list scrolls into view automatically.
Templates#
Managing Templates#
The Templates sub-page lets you build and save reusable email designs:
- Create from a blank canvas or start from a pre-built template
- Organize templates into folders
- Categorize as Marketing, Newsletter, Announcement, Promotion, or Other
- Search and filter your template library
Privacy Controls#
By default, templates are visible to all members of your sub-account. You can make a template private so only you can see it:
- Open the row actions menu (three-dot icon) on any template
- Select Make Private to hide it from other team members
- Select Make Shared to make it visible again
Private templates are only visible to the person who created them.
Agency Library#
Agency-level users (agency owners and admins) can share templates across all sub-accounts. The templates page has two tabs:
| Tab | Contents |
|---|---|
| My Templates | Templates in your sub-account (with folder navigation) |
| Agency Library | Templates shared by agency-level users across all sub-accounts |
To share a template across sub-accounts, an agency-level user creates a template with the "agency" scope. These appear in the Agency Library tab for every sub-account in the agency.
From the Agency Library tab, click Clone to My Templates in the row actions to copy an agency template into your sub-account. The cloned copy is fully editable and independent of the original.
Using Templates#
When creating a campaign, choose From Template to pre-fill the content. You can customize the template content before sending.
Suppressions#
Suppressed contacts are automatically excluded from campaign sends.
Suppression Reasons#
| Reason | How It Happens |
|---|---|
| Bounce | Email delivery failed (added automatically) |
| Unsubscribe | Contact clicked the unsubscribe link (added automatically) |
| Spam complaint | Contact reported as spam (added automatically) |
| Manual | Added by your team |
Managing Suppressions#
The Suppressions page under Campaigns lets you:
- View all suppressed addresses with reason, channel, and date
- Add suppressions manually
- Remove a suppression to re-enable a contact
- Import suppressions from CSV
- Export all suppressions as CSV
Summary#
| Feature | Detail |
|---|---|
| Campaign types | Broadcast (one-time) and Sequence (multi-step drip) |
| Channels | Email and SMS |
| Targeting | All contacts or saved segments |
| Personalization | Merge fields for contact data and custom values |
| A/B testing | Up to 4 variants with tracked results |
| Scheduling | Immediate, scheduled, or active-hours restricted |
| Sequences | Multi-step with delays and conditional branching based on engagement |
| Analytics | Delivery, opens, clicks, bounces, unsubscribes, per-step metrics, recipient export |
| Templates | Reusable designs with folder organization |
| Suppressions | Automatic bounce/unsubscribe handling with manual management |